Thursday, June 28, 2012

Correspondence

My mom's letters to her friend "Rue"
      This weekend, I arrived at my parent's to find a totally empty house. As per my usual habit, the first thing I did was check to see if I had received any mail. I hadn't but there was a whole stack of letters from the 1970's that my mother had written to one of her high school friends. I don't know how or why these letters are back in my mom's possession, but I as I was looking through some of them (Seriously, how could I NOT snoop?), I was hit by a feeling of loss.

     It's pretty silly, I know, considering that I've never really needed to hand write letters (thank you technology), to feel the crazy nostalgia of paper correspondence that I am. But these are beautiful documents of my mother's young adulthood and my kids will never be able to experience what I did as I was looking through them. It was like being able to go back and time and experience my mother in a way that I never would have thought possible. 
It's like a movie picture, isn't it?

     I have always known about my mom's high school friends. In fact, I was supposed to marry one of their sons (such a shame THAT didn't work out) She has had this same group of friends since she was in middle school and they still get together once a year, just so they don't lose touch entirely. I had always thought there was just the four of them, but apparently a girl named Ruth (Rue) moved away after middle school. The group of them wrote her letters until junior year and went on multiple trips to visit her and vice versa. My mother, who wouldn't even let me ride a bus when  I was 20 years old, took a bus out of the state with three of her girlfriends to visit Rue when they were 15! I was flabbergasted (and a little miffed).

One of my mother's letters. Her handwriting is the same today!
      Anyway, you would not BELIEVE her penmanship at 15. It was so strange to see the cursive that I instantly associate with my mom next to big bubble letters and goofy drawings. Even stranger was reading how she wrote about boys, clothes, and dances, just like I would have when I was 15. And these little side notes on the envelope saying things like "Love your neighbour" on the outside flap and "Just don't let anyone see you!" on the inside. It is INCREDIBLE to think of my prim, proper, straight-laced (how many other nice ways are there to say 'uptight'?) mother talking about boys with "hot bods" and throwing around phrases like "the shits" and "wicked bitch." It's a beautiful thing to know that there was a time when she wasn't perfect and moral. At one point, she talks about the one boyfriend she had in high school and how he asked her to go steady, but she wouldn't because she liked looking at other boys too much! All my life, I have believed that my mother has ALWAYS hated boys and then, BOOM! one letter changes my whole outlook on her.

     Now I'm trying to figure out who I can write letters to. I tried writing to Kris in the first year of our relationship (since we lived hours apart, I figured it would be a good way to bond). However, he can't read my handwriting and never bothered to write me back (considering it was much easier to call me or shoot me a text), which killed the romance of it. I don't mind too much, his handwriting is atrocious (at least mine is legible), and he was practically born with the ability to type. But, it would be so lovely to be able to look back at our letters 30 years from now and remember how we once were. That still leaves me with the dilemma of who to write to though.


Saturday, June 16, 2012

Spa Day II: The Burning Mask

     I had to work this Saturday, which meant half a day alone at the house, aka Spa Day! On this week's agenda: The burning mask (minus a few ingredients).

     I saw the burning mask/honey cinnamon and nutmeg on Pinterest and the blog with the recipe for the burning mask here and one for the honey, cinnamon and nutmeg one here. Both claim to help calm skin and reduce acne scars and since I have a ton of acne scars (some of which, I swear, are left over from high school) I thought I'd give it a try.

The honey cinnamon mask
    The recipe for the burning mask calls for cinnamon, nutmeg, honey, and lemon juice, while the other one obviously just calls for honey, nutmeg, and cinnamon. Well, I only had honey and cinnamon in my cabinets (though I intend to try it with lemon juice in the future), so that's what I went with.

     I used a teaspoon of cinnamon and a teaspoon and a half of honey. It was a super simple mixture and went on my face very easily. I had just enough to cover my whole face, but I was scraping the container to get enough for my forehead (you can see how it's not as well covered as it could be).

The mask melting off my face


     (I also did the egg/olive oil hair mask again, this time using egg whites and more olive oil. I'm hoping that I'll see more of an improvement and less eggs in my dry hair this week.)

The after-shot
The mask smells amazing, like the other bloggers say, but it melts! I had it on for less than five minutes before it started sliding off my face. Perhaps the nutmeg would have been helpful in keeping it from getting runny...I'm also thinking the lemon juice would be good to even out the viscosity a little. 

     It took forever and a day to rinse the mask off my face and it made a huge mess, but my skin feels lovely. I don't think it did much for my acne scars, but maybe after a few more "treatments" it'll do some good. Also, from what I've read, the use of the lemon juice should help the potency of the mask a bit.

    After today, my bathroom smells like the kitchen exploded in it-everything from vinegar to egg to cinnamon to coffee grounds and vanilla went onto my body today (I also did a vinegar hair rinse and used my vanilla cappuccino body scrub from a couple of weeks ago). I feel lovely and soft and smell kinda goofy (due to the egg/vinegar hair stuff).

What are your favorite DIY spa treatments? Have you tried the burning mask yet?  
    

Thursday, June 14, 2012

My Try a DIY Skinnies

My new jeans!
     I just inherited ten (!) pairs of old jeans from my sister. The good news is: I don't have to wear my jeans whose zipper broke six months ago from Rue 21! anymore! Yay! But the bad news is they are all super light rinses and and were all flared or boot cuts, aka, super out-dated. I was grateful for the jeans, but pretty bummed that they weren't the kind that I would actually enjoy wearing.

    But that was yesterday. Today, the best pairs are now skinnies! I was sooooo inspired by this blog on ModCloth ages and ages ago, but didn't have any jeans with which try out the revamping. Since I went through my 
wardrobe minimization, I've been living in three pairs of jeans, two of which have zippers that hate me and one of which has a zipper that broke two days after I bought them. Now that I had a supply of jeans to experiment with, I went right to work!

It was ridiculously easy! I didn't follow the tutorial exactly (I'm such an instant gratification junkie...), but the jeans turned out AMAZING! I turned 4 pairs into skinnies and it took me about 20 minutes per pair. The hardest part was pinning the jeans to fit my legs. I ended up sitting on the floor and starting at my ankle and working up to my knee, but it would have been sooooo much easier if I'd had someone pinning them for me. 

 However, now I'm left with four pale pairs of skinnies that are great for work and around the house, but aren't quite as glamorous as the skinnies I've seen in stores and magazines. I'm hoping that my next project will involve some bleach and fabric dye via this blog. 


Tuesday, June 12, 2012

$2 Dining Room DIY

My $2 dining room make-over
     This weekend, I was at my parent's house while Kris was working, so I decided to stop by the consignment shop I'd taken my Plato's Closet rejects to a few weeks back and lo! I had $56 waiting for me! I took the opportunity to  go thrifting.

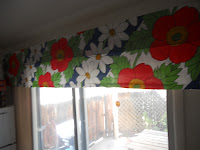
     I ended up finding this beautiful retro sheet and it reminded me that I wanted to try to make my own cloth napkins (the super easy and fantastic directions for which are found here). The sheet I bought (for $2!) ended providing me with 12 napkins, a table runner and a modern valance to go over our sliding glass doors! I am so pleased with how everything turned out. The dining room looks like we're throwing a party, it's so bright and pretty.

I will eventually get napkins rings
     Oh! And that's not even the best part! Everything was really simple to sew. I have this love-hate relationship with sewing machines that has something to do with my inability to thread a machine properly. All of the sewing was straight lines, so all I had to do was make sure I ironed my hems properly before I started sewing. I swear, this is the first time I followed ALL of the directions whilst sewing something. Of course, that didn't stop me from making wavey seams, but they're hard to notice under the gorgeous pattern of the material. Still, I have to give thanks to Mrs. Trench, my high school sewing teacher, who would have been delighted by the fact that I managed to sew half of them in straight lines.

The fancy-schmancy table!

Close up of the valance. :)
I feel like such a classy gal now that we have a table cloth (also found thrifting this weekend for $3!) and napkins and a table runner that matches the curtains. The rest of the house is full of our landlord's leftovers (Which, by the by, weren't even pretty when they were new. He constantly brings things he doesn't want to get rid of, but his wife won't let him keep...It's like I live in a storage shed). But now there is one room in the house that is pretty and nice and I am SO THRILLED!

Sunday, June 3, 2012

DIY Spa Day

    This weekend I had to work on Saturday, which meant I couldn't go with Kris to our hometown when he left on Friday to go to work for the weekend. This is my first weekend alone in Denver, and I must admit, after I got off work on Saturday, I didn't leave. I spent Saturday evening laying around and watching the last season of Gilmore Girls and plotting what I'd do on Sunday via Pinterest.

   I've seen all kinds of DIY recipes for hair masks and facials and since Kris wasn't here to make fun of me for "glopping random stuff on my face," I decided to try some of them out.

     I started my day out with an egg/olive oil hair mask. We recently received 18 farm fresh eggs and we haven't had much time to make breakfast lately, so I wanted to put them to good use. I used two full eggs (some recipes recommended just using the whites, but I figured it didn't matter much). I whisked them together, combed it into my hair, and wrapped my hair on top of my head for the day. I saw some tutorials that said to leave this sort of mix on for 20 minutes and some that said to leave it on for as long as possible for the best effect. My hair's been suffering lately, so I opted for as much of an impact as possible, but more on that later.

    My next recipe was a three part baking soda/one part water facial scrub deemed to provide the same results of microderm abrasion. It was easy and cheap, so I figured it was worth trying. I didn't use the whole mixture and didn't notice any significant different in my skin, though that could be because I went straight to a honey mask next. I didn't have any of the recommended mix-ins for a honey mask (oatmeal, nutmeg, lemon juice, etc...), but I figured since honey was the main ingredient, I would be okay if I just shmeared plain honey on my face. I left it on for about 30 minutes and after I washed it off, my skin was nice and soft.

     Later, after some intense house cleaning, I mixed up what I'm calling a vanilla cappuccino scrub and a balsamic peppermint hair rinse. The scrub is made up of whatever was laying around my kitchen that I'd seen in miscellaneous recipes online:
  • Three tablespoons of the coffee grounds from my breakfast coffee
  • Half a cup of brown sugar
  • A quarter cup of olive oil
  • A few drops of vanilla 
This one actually worked beautifully. It smells amazing and my skin was silky soft. The only problem was that it left my bathtub a huge mess, due to the coffee grounds.

    I did the same sort of scrounging for the rinse:
  • 1/4 cup balsamic vinegar
  • 3/4 cup water
  • 10 drops peppermint oil
 Vinegar is the primary ingredient tons of hair rinses, and I thought the peppermint oil would help stimulate circulation to my scalp and encourage my hair to grow.

     My shower was kind of a fiasco. By the time I got in, the mask from the morning had gone completely hard (I'm still not sure if that's a good thing) and it took me ages to rinse it out. I ended up having to use shampoo anyway, just because I couldn't stand the thought of having raw egg in my hair without some sort of attempt to get it out. After I'd rinsed my shampoo out, I used half of the vinegar concoction before I conditioned it. After I'd let the conditioner sit, I used the rest of the vinegar to help rinse it out. The peppermint left my scalp all lovely and tingly and did wonders to mask the scent of the vinegar. My hair feels lovely and silky, though I'm terrified that I missed some of the egg and will be wandering around with it in my hair for ages.

    Next on my list of things to try is a lemon juice toner, a multi-ingredient honey mask, and a gelatin peel. What are your favorite DIY beauty recipes?